The Best Knives and How to Use Them Like a Master Chef
 For slicing, use a chef's knife or santoku knife.
- There are a few key knives you need to become a master chef, each serving its own unique purpose.
- Chef’s knives and paring knives are your all-purpose utility knives, while boning knives and carving knives are used for specialized cutting tasks.
- Perfecting your knife skills takes time, practice, and patience.
There are kitchen knives, and then there are kitchen knives that will take you to master-chef level. That swift chop, that quick dice — these culinary skills are all within your grasp if you have the proper tools.
Knives are the first really tangible investment towards your love of cooking, and the most important tools you have in your kitchen. A master chef-worthy knife doesn't need to be fancy or expensive. It just needs to be high quality, hard-wearing, and designed to last you a good number of years. After all, there's a lot of slicing that needs to be done on the road to becoming a master chef.
Thankfully, there are a number of great high-quality knives at reasonable price points. As long as you care for them properly, keep them sharp, and protect them when they’re not in use, you can count on your kitchen knives performing well and making your cooking experience much more enjoyable.
We’re going to look at four knives and how to make the most out of them. Two of these — the chef’s knife and paring knife — are essentials for every homecook. You’ll use them everyday. The other two — the boning knife and the carving knife — are highly specialized. You may not use them more than a few times a year, but they can be useful to serious meat eaters or anyone who wants to try out specialized techniques.
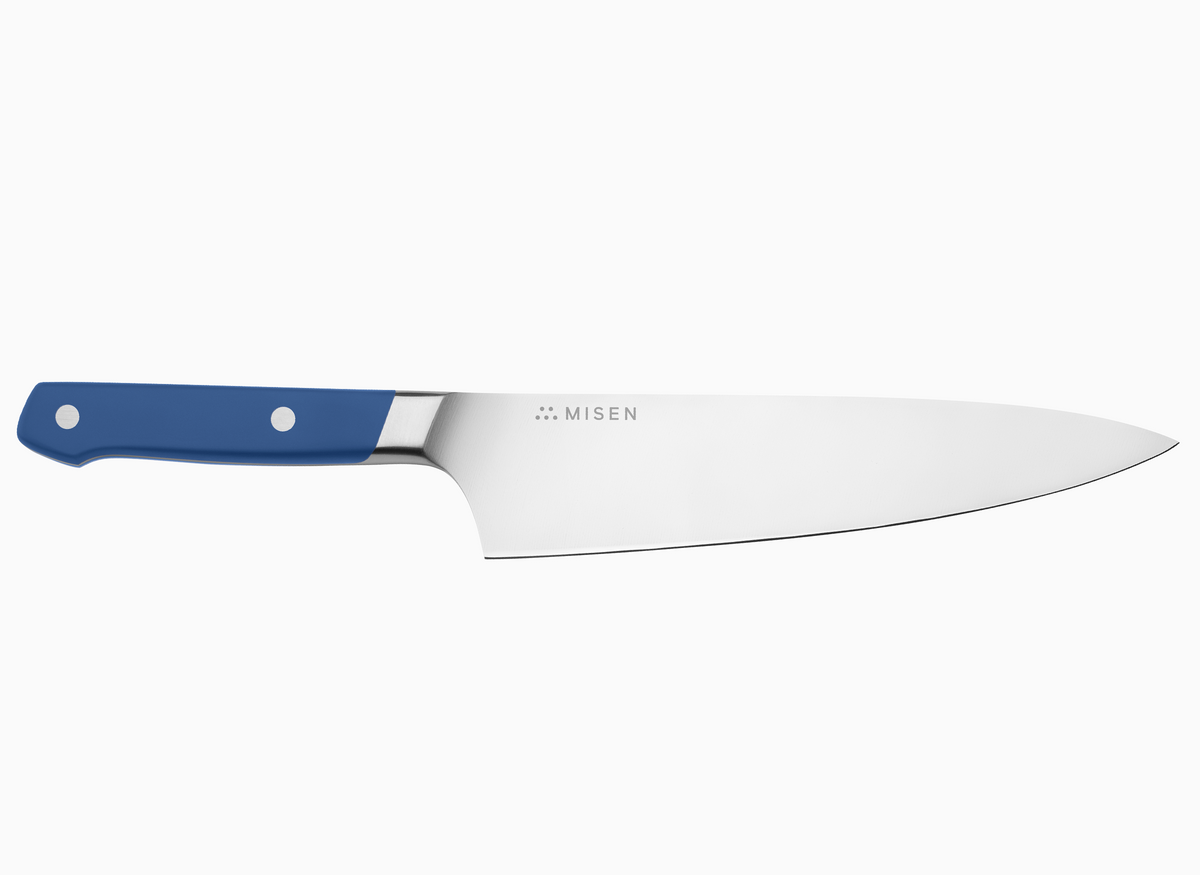
Chef’s Knife
Aptly named, the chef's knife (or cook's knife) is your go-to kitchen tool. Expect to use this knife almost every time you cook. Whether it's slicing, dicing, mincing, or chopping, a chef's knife will get the job done. And for this reason, it's the first knife you need to start learning your culinary basics.
What Is a Chef’s Knife?
Chef’s knives are typically 8-12 inches long with a long blade that cleanly slices through most items. There are two main blade shapes that are common in western-style chef's knives: the German profile and the French profile.
German profiles, such as the Wüsthof Classic and Zwilling J.A. Henckels International, have a greater arc to the blade (called a “belly”) that facilitates the easy back-and-forth rocking technique of cutting. French profile chef’s knives, on the other hand, such as ones by Messermeister and Global G, have straighter, almost triangular, blades more suited to slicing in a downward and pull back motion.
Another alternative is the Japanese-style santoku knife, which is smaller and has a straighter sharp edge, but performs the same functions as a chef knife.
While blades are commonly made of stainless steel, high-carbon stainless steel, or ceramic, the best chef’s knives are made from high-carbon stainless steel because it gives them a superior, longer-lasting cutting edge.
How to Use a Chef's Knife
The first step is to take hold of the chef knife. Do this by placing your index finger and thumb over opposite sides of the blade’s heel (the wide part of the blade, closest to the handle), and loosely curl your remaining three fingers around the handle. If this feels unnatural, try relaxing your grip and shifting the knife around a little — your hand will eventually get the hang of it.
Most basic cuts start by first squaring off the organically-shaped meat or produce and then slicing it into uniform shapes. This promotes uniform cooking times and makes for a prettier dish.
To practice, start with a whole vegetable, like a peeled onion or potato. Trim off the top and bottom ends, and split the vegetable in half. Now, depending on the cut you want to make, you can either slice each half into strips (one-eighth inch thick for a julienne, one-quarter inch for a batonnet) and proceed with your next ingredient, or you can further dice the strips into cubes (three-quarter inch for carré, one-sixteenth inch for brunoise). Rinse and repeat.
Paring Knife
 Use your paring knife for detailed work like peeling and seeding citrus.
A paring knife is a smaller version of your chef’s knife and is, as expected, good for dealing with smaller items. Its compact size allows it to perform delicate, precise kitchen tasks that a bigger instrument would be too clunky to accomplish.
What Is a Paring Knife?
The blade of a paring knife is a mere 2-4 inches with the whole knife fitting comfortably in the hand. This gives you maximum control when using it and makes it easier and safer to perform more detailed cutting work.
Aside from its namesake purpose of paring skin from produce, the paring knife comes in handy during a number of situations — when deveining shrimp, de-seeding jalapeños, slicing bananas, piercing boiled potatoes to check if they’re done, and so on. Pretty much any time you need something sharp and convenient, you can turn to a paring knife.
Paring knives come with a variety of blade shapes, the main ones being the classic spear tip, the bird’s beak, and the sheep’s foot. The classic spear tip is the most common of the three, and the one you want to start off with. Its blade is curved on both top and bottom, forming a strong tip.
The bird’s beak blade has a hook- or claw-like appearance, which makes it good for trimming and peeling (or carving Jack-O-Lanterns), while the sheep’s foot features a straighter sharp edge that works well in slicing cheese cubes and julienning vegetables.
How to Use a Paring Knife
Thanks to its petite size, there are many different grips and cutting methods that you can apply when using a paring knife. You can work on a cutting board, mincing shallots and cutting citrus segments. You can also work completely with your hands, holding the knife in one and food in the other, peeling and paring as you let the trimmings fall into a bowl.
Two top paring knife skills to work on are peeling and cleaning. To start peeling, hold the food item — say, an apple — in your non-dominant hand. With your dominant hand, wrap your fingers completely around the knife handle with your knuckles hugging the top of the handle. Make sure you have a firm but comfortable grip.
Now, place the blade against the surface of the apple and your thumb a few inches away from the blade. You’re going to peel in the direction of your thumb.
Make a slight cut into the apple peel, and slip the knife beneath the skin. While holding the paring knife in place, slowly start turning the apple. The peel should start cutting away in a spiral pattern. If the knife separates from the apple and peel, simply start again from where you left off.
A paring knife is also used to clean up ingredients — removing stems, bruised areas, or tough inedible parts. To do this, start by applying a pinch grip to the blade heel, using your thumb and index finger, similar to how you would hold a dart. Insert the tip of the blade right beside the element you want to remove and start sliding it across the flesh until the unwanted area is cut right out.
Boning and Fillet Knives
 Fillet knives are specialty knives mostly used by fishmongers.
Now, we move on to cutting meats. Only true carnivores will need this specialty knife. Boning knives and fillet knives are special purpose kitchen tools, designed to prepare meats, poultry, and fish. In addition to removing bones, they are the best knives to cut away fat and skin, slice through joints, and clean up various cuts of meat before cooking.
Now, the average home cook doesn’t really need a boning of fillet knife, as they aren’t breaking down whole meats and fish on a regular basis. These two are more specific, technical tools used by butchers and experts; and for the most part, all your daily kitchen cutting can be done with a chef’s knife. But if you’re looking to gain technical expertise preparing meat, you can try these knives on for size.
What Are Boning and Fillet Knives?
Boning and fillet knives are easy to tell apart from other knives in your kitchen. These knives are designed narrow and long — about 6-11 inches long — so they can nimbly cut around bones and small ribs. They’re also distinctly flexible so they will curve along the different parts of meat. Stiffer blades are available for tougher red meats, while the more flexible varieties are intended for poultry and fish.
To be clear, a fillet knife is a type of boning knife. But unless you’ve handled a lot of uncooked meat, it’s common for most home cooks to use these two knives interchangeably. Some knife makers, such as Shun and Victorinox, have even developed dual-purpose boning/fillet knives. However, there are some subtle differences worth noting.
Boning knives, while thinner than most kitchen knives, are not as thin or flexible as fillet knives. Their blades are typically straight with a pointed tip, designed to easily slice through tougher meat, while still being able to cleanly cut away any unwanted parts.
Fillet knives are much thinner, more flexible, and ideal for addressing more delicate meats. Some blades also feature an upward curve, which is ideal for removing skin from fish in a single cut.
How to Use Boning and Fillet Knives
When boning or filleting, it's best not to rush. This ensures you make the right cut and avoid any accidental slips. A general rule is to use your non-dominant hand to stabilize the meat, positioning it away from the knife's cutting edge.
Place your meat in the middle of your cutting board. Locate the bone you want to remove, and hold it securely with your non-dominant hand. Insert the tip of the knife right beside the bone. Start cutting along the length of the bone, using a saw-like motion and gently pulling the meat away to help with separation. Once the bone is removed, clean up any cartilage or sinew from the rest of the meat.
To remove skin from fish, lay the fillet on the cutting board, skin-side down with the narrowest part closest to you. Use the tip of the fillet knife to make a small slice at the narrow end, directly between the skin and meat.
While holding the skin taut, continue sliding the knife away from you, running the entire length of the fish. Feel free to pause midway through to readjust your grip on the skin and make sure you're not cutting away too much of the flesh.
Carving Knife
Carving or slicing knives aren't essential cutting tools. You may not even use them every month, only during parties and holiday dinners — which is exactly why you should take the time to perfect using them.
Carving knives are the most public-facing of the lot, made for slicing 10-pound pot roasts and glistening Christmas hams right on top of the dining table. It's a much-awaited event for all to see. And thus, the best way to showcase all your hard-earned knife skills.
What Is a Carving Knife?
Carving and slicing knives are designed to cut large chunks of meat. Unlike steak knives, they have long, narrow blades — ranging from 8-14 inches — that can pass completely through large turkeys and roasts. And their comparatively thinner width reduces the amount of resistance as it moves back and forth. Essentially, the less cutting and friction, the less damage is done to the meat.
The main difference between the two is that a carving knife tapers to a sharp point, while a slicing knife is the same width throughout and ends in a curvy snub-nose shape. Pointed tips are great for slicing through bone-in meats or ribs. Rounded tips are a safer option if you're simply carving slices of turkey, ham, or roast and serving directly onto people’s plates.
For this particular knife, it's best to opt for one made in high-carbon steel. Steel knives are much stronger, which is important for penetrating through thick cuts of meat with such a thin blade.
How to Use a Carving Knife
Before taking your first slice, make sure the meat is cooked properly and has rested for about 20-30 minutes. Slicing into overcooked (or worse, undercooked) meat is not a pretty sight. Resting the meat also allows it to finish cooking and redistributes the juices for better taste and texture.
Place the meat in the centre of your cutting board. Rather than using your hands to hold it in place, it’s better to use a cutting fork that pierces cleanly through the meat.
If you’re working with poultry or other bone-in meats, begin by removing any appendages (i.e., legs or wings), using the tip of the knife blade to probe for the connecting joints. Once you find them, slice into the spot with one swift motion and use your hand to pull that part from the body.
After you’ve whittled your poultry down to a manageable size, start by cutting the meat away from the bones. Use your fork to keep the meat steady, and make long thin slices about half-an-inch thick. Always cut against the grain (perpendicular to the muscle fibers) — this gives you a less chewy, more tender bite. Try to slice as fluidly as possible, rather than sawing through the meat.
Transfer the slices neatly to individual plates or a pre-heated serving platter. Sliced meat cools fast, so make sure to serve it quickly or have a boat of hot gravy ready to pour on top.
For boneless meats, slice only what you’re serving and keep the leftovers as a single piece. For poultry, it’s best to remove all the bones before storing to prevent the meat from acquiring a bitter, fowl-y taste.
Ways to Keep Improving Your Knife Skills
 The rocking action of a chef's knife is perfect for mincing aromatics.
These are the different knives and cutting techniques needed to become a pro chef. From basic chopping to impressive carving, it all starts at the cutting board. As you continue to hone your skills, here are a few key pointers to keep in mind on your way to chopping mastery:
Maintain a razor-sharp knife: Sharp knives seem scary but are actually much safer than dull ones. They slice through food more easily, without you having to exert a lot of effort, and they lessen your overall cutting time. For these reasons, we recommend investing in a good knife sharpener.
Cut on a stable surface: Make sure your cutting board is perfectly flat and doesn’t slide around the table. If your cutting board is on a stone or marble countertop, you can place a damp kitchen towel beneath the board to keep it in place.
Keep your fingers safe: Curl the fingers on your non-chopping hand into a little claw, so your knuckles are closer to the knife than your fingertips. Tuck your thumb behind your other fingers. This keeps all your fingers in a safer position, out of the knife’s way.
Focus: Chopping is a repetitive activity, and it’s easy to let your mind wander as your body continues to move. Be mindful of your motions, especially at the start, and take your time.
Final Points
Now, you know what needs to be done to become a master chef. All it takes is a few primary knives and some basic instructions. No fancy tricks or easy shortcuts — just lots of practice and enough time to wrap your head (and hand) around these kitchen knives.